文章摘要

本文详细介绍了在 Linux 系统(Debian/Ubuntu 和 RHEL/CentOS)上安装 MySQL 8.0 的完整流程,涵盖以下核心内容:

  1. 系统适配安装步骤
    • Debian/Ubuntu:通过添加官方APT仓库、安装服务、安全配置向导完成部署。
    • RHEL/CentOS:使用YUM仓库安装,需获取临时密码并重置安全策略。
  2. 关键操作命令
    • 系统更新、仓库配置、服务启停(systemctl)、安全初始化(mysql_secure_installation)。
    • 验证安装:mysql --version 及登录测试。
  3. 可选远程访问配置
    • 创建远程用户并授权,修改 bind-address 为 0.0.0.0,开放防火墙端口(3306)。
  4. 常见问题解决
    • 忘记密码:通过跳过权限表重置。
    • 密码策略调整:降低复杂度要求。
    • 服务故障排查:查看错误日志定位问题。

一、Debian/Ubuntu 系统安装

1. 更新系统包

sudo apt update && sudo apt upgrade -y

2. 添加MySQL APT仓库

wget https://dev.mysql.com/get/mysql-apt-config_0.8.28-1_all.deb
sudo dpkg -i mysql-apt-config_0.8.28-1_all.deb
  • 出现提示时选择 MySQL Server & Cluster → mysql-8.0,然后按回车确认。

3. 更新APT仓库

sudo apt update

4. 安装MySQL Server

sudo apt install mysql-server -y

5. 启动MySQL服务

sudo systemctl start mysql
sudo systemctl enable mysql

6. 运行安全配置向导

sudo mysql_secure_installation
  • 按提示操作:设置root密码、删除匿名用户、禁止远程root登录、删除测试数据库等。

7. 验证安装

mysql --version
# 登录MySQL
sudo mysql -u root -p

二、RHEL/CentOS/Fedora 系统安装

1. 更新系统包

sudo yum update -y
# 或使用dnf(Fedora/CentOS 8+)
sudo dnf update -y

2. 添加MySQL YUM仓库

sudo rpm -Uvh https://dev.mysql.com/get/mysql80-community-release-el7-6.noarch.rpm
# CentOS 8+/Fedora 使用:
sudo rpm -Uvh https://dev.mysql.com/get/mysql80-community-release-el8-6.noarch.rpm

3. 启用MySQL 8.0仓库

sudo yum-config-manager --enable mysql80-community
# 或手动编辑文件:/etc/yum.repos.d/mysql-community.repo

4. 安装MySQL Server

sudo yum install mysql-community-server -y
# 或使用dnf:
sudo dnf install mysql-community-server -y

5. 启动MySQL服务

sudo systemctl start mysqld
sudo systemctl enable mysqld

6. 获取临时root密码

sudo grep 'temporary password' /var/log/mysqld.log

7. 运行安全配置向导

sudo mysql_secure_installation
  • 输入临时密码后,按提示设置新密码并完成安全配置。

8. 验证安装

mysql --version
# 登录MySQL
mysql -u root -p

三、配置远程访问(可选)

  1. 登录MySQL:
mysql -u root -p
  1. 创建用户并授权(示例):

sql

CREATE USER 'username'@'%' IDENTIFIED BY 'StrongPassword!';
GRANT ALL PRIVILEGES ON *.* TO 'username'@'%' WITH GRANT OPTION;
FLUSH PRIVILEGES;
  1. 修改MySQL配置文件:
sudo nano /etc/mysql/mysql.conf.d/mysqld.cnf  # Debian/Ubuntu
sudo nano /etc/my.cnf  # CentOS/RHEL

找到 bind-address = 127.0.0.1 改为 bind-address = 0.0.0.0,保存后重启服务:

sudo systemctl restart mysql   # Debian/Ubuntu
sudo systemctl restart mysqld  # CentOS/RHEL
  1. 开放防火墙端口(如启用):
sudo ufw allow 3306/tcp  # Debian/Ubuntu
sudo firewall-cmd --permanent --add-port=3306/tcp  # CentOS/RHEL
sudo firewall-cmd --reload

四、常见问题

  1. 忘记root密码
    • 停止MySQL服务,启动时跳过权限检查:
      sudo systemctl stop mysql
      sudo mysqld_safe --skip-grant-tables &
    • 登录后重置密码:
      ALTER USER 'root'@'localhost' IDENTIFIED BY 'NewPassword';
  2. 密码策略调整
    SHOW VARIABLES LIKE 'validate_password%';
    SET GLOBAL validate_password.policy = LOW; # 降低密码强度要求
  3. 服务启动失败
    • 检查错误日志:
      sudo tail -f /var/log/mysql/error.log # Debian/Ubuntu
      sudo tail -f /var/log/mysqld.log # CentOS/RHEL

按照以上步骤操作后,MySQL 8.0 应已成功安装并运行。

-bash: lsof: command not found” 是由于您的系统找不到 lsof 命令引起的。通常在 Linux 和 Unix 系统上使用。

要解决这个问题,您需要检查您的系统是否安装了 lsof 工具。您可以尝试通过以下命令检查:

lsof -i:80

如果输出为空或返回 “command not found”,则说明您的系统未安装 lsof 工具。

对于基于 Debian 或 Ubuntu 的系统,您可以通过以下命令安装 lsof 工具:

sudo apt update
sudo apt install lsof

对于基于 Red Hat 或 Rocky Linux 的系统,您可以通过以下命令安装 lsof 工具:

sudo yum install lsof

如果您使用的是其他 Linux 或 Unix 发行版,请参考其文档或使用适合您的包管理器来安装 lsof 工具。

希望以上信息可以帮助您解决问题。

文章介绍了在Windows10和11系统中如何通过修改注册表或用户设置来确保数字小键盘在开机时默认开启。在Win10中,可以通过更改InitialKeyboardIndicators的数值数据为80000002;在Win11中,除了修改注册表,还可以通过在登录界面手动开启NumLock然后重启让系统记住设置。

1、Win10设置默认开启数字小键盘

运行Win + R 组合键,打开 cmd,输入 regedit ,打开注册表编辑器

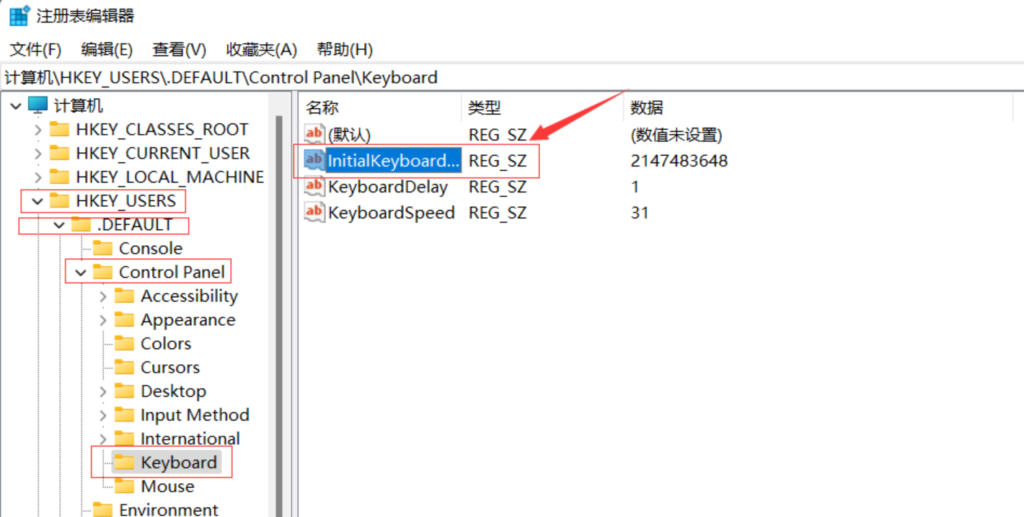
在注册表编辑器中,依次展开 HKEY_USERS == 》 .DEFAULT ==》 Control Panel ==》 Keyboard ,点击 Keyboard 之后在右侧窗口中找到 InitialKeyboardIndicators 项目,双击进入。

3.将 InitialKeyboardIndicators 项目的数值数据由 2147483648,修改为 80000002 ,并点击确定按钮。

5、将电脑重新启动,看看是否win10开机默认开启了小键盘。

InitialKeyboardIndicators 的键值的作用:
InitialKeyboardIndicators 应该分开翻译: Initial Keyboard Indicators , 意思是 最初的键盘指示灯

作用
KeyboardIndicators0表示关闭所有指示器
InitialKeyboardIndicators1表示开启Caps Lock (大写键)
InitialKeyboardIndicators2表示开启Num Lock ()
InitialKeyboardIndicators4表示开启Scroll Lock(在Thinkpad中与Num Lock是同一个)
KeyboardDelay1键盘延迟,一般设为1就行
KeyboardSpeed31键盘速度,可随便设

2、Win11设置默认开启数字小键盘

方法一:

开机到登录界面后
手动按一下 numlock
然后 直接点重启,下次就自动记住了

原理应该是让操作系统记住了用户的设置

方法二:

同上述Win 10操作,进入注册表编辑器,将 InitialKeyboardIndicators 项目的数值数据由 2147483648,修改为 80000002

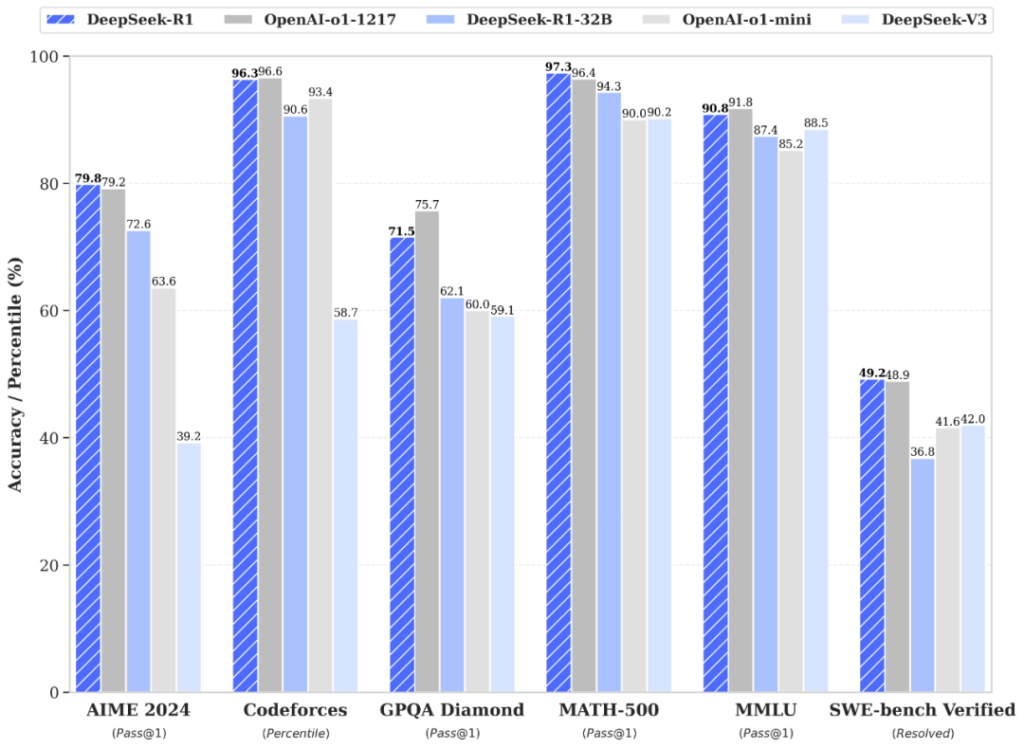
今天,我们正式发布 DeepSeek-R1,并同步开源模型权重。

  • DeepSeek-R1 遵循 MIT License,允许用户通过蒸馏技术借助 R1 训练其他模型。
  • DeepSeek-R1 上线 API,对用户开放思维链输出,通过设置 model='deepseek-reasoner' 即可调用。
  • DeepSeek 官网与 App 即日起同步更新上线。

性能对齐 OpenAI-o1 正式版

DeepSeek-R1 在后训练阶段大规模使用了强化学习技术,在仅有极少标注数据的情况下,极大提升了模型推理能力。在数学、代码、自然语言推理等任务上,性能比肩 OpenAI o1 正式版。

在此,我们将 DeepSeek-R1 训练技术全部公开,以期促进技术社区的充分交流与创新协作。

论文链接: https://github.com/deepseek-ai/DeepSeek-R1/blob/main/DeepSeek_R1.pdf

蒸馏小模型超越 OpenAI o1-mini

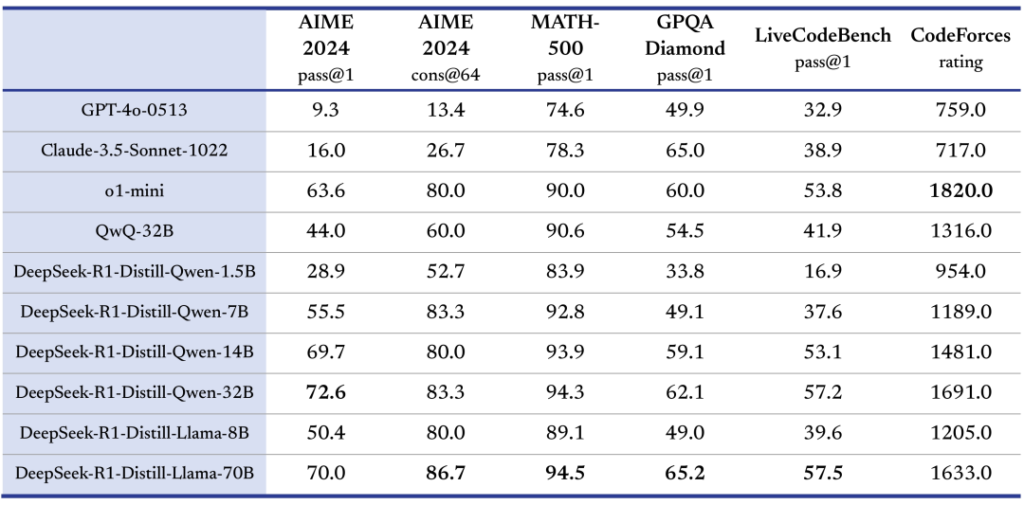
我们在开源 DeepSeek-R1-Zero 和 DeepSeek-R1 两个 660B 模型的同时,通过 DeepSeek-R1 的输出,蒸馏了 6 个小模型开源给社区,其中 32B 和 70B 模型在多项能力上实现了对标 OpenAI o1-mini 的效果。

HuggingFace 链接: https://huggingface.co/deepseek-ai

开放的许可证和用户协议

为了推动和鼓励开源社区以及行业生态的发展,在发布并开源 R1 的同时,我们同步在协议授权层面也进行了如下调整:

  • 模型开源 License 统一使用 MIT。我们曾针对大模型开源的特点,参考当前行业的通行实践,特别引入 DeepSeek License 为开源社区提供授权,但实践表明非标准的开源 License 可能反而增加了开发者的理解成本。为此,此次我们的开源仓库(包括模型权重)统一采用标准化、宽松的 MIT License,完全开源,不限制商用,无需申请。
  • 产品协议明确可“模型蒸馏”。为了进一步促进技术的开源和共享,我们决定支持用户进行“模型蒸馏”。我们已更新线上产品的用户协议,明确允许用户利用模型输出、通过模型蒸馏等方式训练其他模型。

App与网页端

登录DeepSeek官网或官方App,打开“深度思考”模式,即可调用最新版 DeepSeek-R1 完成各类推理任务。

API 及定价

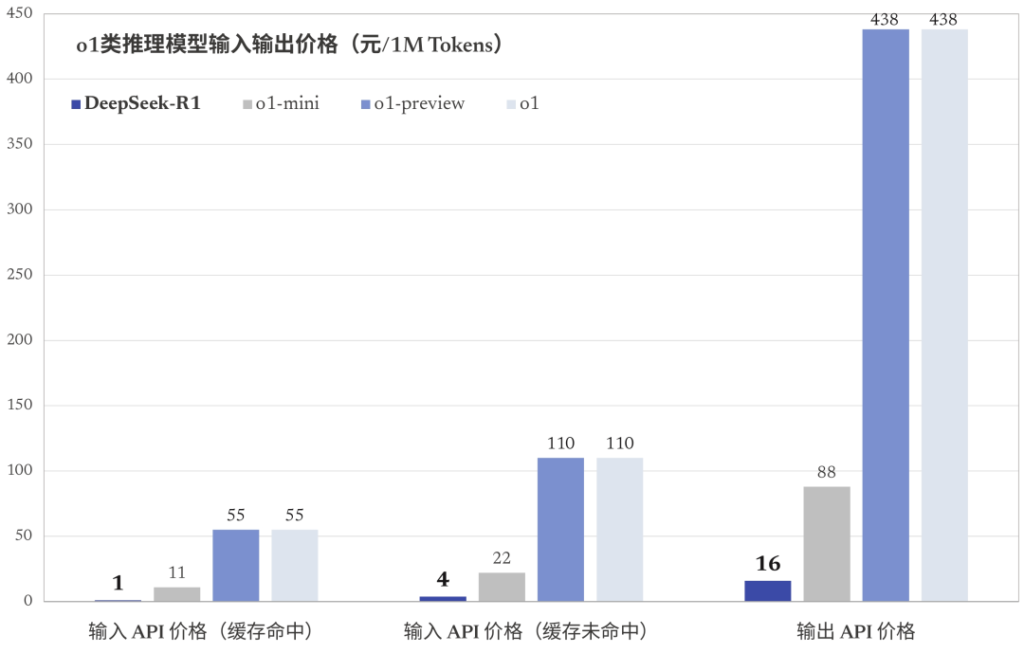
DeepSeek-R1 API 服务定价为每百万输入 tokens 1 元(缓存命中)/ 4 元(缓存未命中),每百万输出 tokens 16 元。

详细的 API 调用指南请参考官方文档:  https://api-docs.deepseek.com/zh-cn/guides/reasoning_model

1、安装先决条件

sudo apt install curl gnupg2 ca-certificates lsb-release ubuntu-keyring

2、导入官方 nginx 签名密钥

获取密钥:

curl https://nginx.org/keys/nginx_signing.key | gpg --dearmor \
    | sudo tee /usr/share/keyrings/nginx-archive-keyring.gpg >/dev/null

验证下载的文件是否包含正确的密钥:

gpg --dry-run --quiet --no-keyring --import --import-options import-show /usr/share/keyrings/nginx-archive-keyring.gpg

输出:

pub   rsa4096 2024-05-29 [SC]
      8540A6F18833A80E9C1653A42FD21310B49F6B46
uid                      nginx signing key <signing-key-2@nginx.com>

pub   rsa2048 2011-08-19 [SC] [expires: 2027-05-24]
      573BFD6B3D8FBC641079A6ABABF5BD827BD9BF62
uid                      nginx signing key <signing-key@nginx.com>

pub   rsa4096 2024-05-29 [SC]
      9E9BE90EACBCDE69FE9B204CBCDCD8A38D88A2B3
uid                      nginx signing key <signing-key-3@nginx.com>

为 nginx 软件包设置 apt 存储库:

echo "deb [signed-by=/usr/share/keyrings/nginx-archive-keyring.gpg] \
http://nginx.org/packages/ubuntu `lsb_release -cs` nginx" \
    | sudo tee /etc/apt/sources.list.d/nginx.list

默认情况下,安装稳定版(stable)nginx,如果要安装主线版本(mainline) nginx包,请运行以下命令:

echo "deb [signed-by=/usr/share/keyrings/nginx-archive-keyring.gpg] \
http://nginx.org/packages/mainline/ubuntu `lsb_release -cs` nginx" \
    | sudo tee /etc/apt/sources.list.d/nginx.list

3、安装nginx

sudo apt update
sudo apt install nginx

如果出现异常:

N: Skipping acquire of configured file 'nginx/binary-i386/Packages' as repository 'http://nginx.org/packages/mainline/ubuntu focal InRelease' doesn't support architecture 'i386'

修改 /etc/apt/sources.list.d/nginx.list 文件,加入 arch=amd64,如:

deb [signed-by=/usr/share/keyrings/nginx-archive-keyring.gpg] http://nginx.org/packages/ubuntu focal nginx

改为

deb [signed-by=/usr/share/keyrings/nginx-archive-keyring.gpg arch=amd64] http://nginx.org/packages/ubuntu focal nginx

修改完后再执行

sudo apt update
sudo apt install nginx

相关文献:https://askubuntu.com/questions/1446076/nginx-doesnt-support-architecture-i386

查看nginx版本

nginx -v

nginx version: nginx/1.24.0

3、启动 nginx

#启动
systemctl start nginx
#检查状态
systemctl status nginx
#设置自启动
systemctl enable nginx

到此,Nginx安装结束。

官方英文原文:https://nginx.org/en/linux_packages.html#Ubuntu

-bash: whois: command not found” 是由于您的系统找不到 whois 命令引起的。通常在 Linux 和 Unix 系统上使用。

要解决这个问题,您需要检查您的系统是否安装了 whois 工具。您可以尝试通过以下命令检查:

which whois

如果输出为空或返回 “command not found”,则说明您的系统未安装 whois 工具。

对于基于 Debian 或 Ubuntu 的系统,您可以通过以下命令安装 whois 工具:

sudo apt-get update
sudo apt-get install whois

对于基于 Red Hat 或 Rocky Linux 的系统,您可以通过以下命令安装 whois 工具:

sudo yum install whois

如果您使用的是其他 Linux 或 Unix 发行版,请参考其文档或使用适合您的包管理器来安装 whois 工具。

希望以上信息可以帮助您解决问题。

使用 cloudflared 和 systemd 在 Linux 上设置 DNS over HTTPS (DoH)

Linux 上如何使用 systemd 设置 DNS over HTTPS (DoH) ?通过利用 systemd,我们可以确保在启动时自动启动提供 DoH 服务的 cloudflared

第一步:安装 cloudflared

  1. 首先,下载 cloudflared
wget https://github.com/cloudflare/cloudflared/releases/latest/download/cloudflared-linux-amd64

Copy

  1. 使二进制文件可执行并移至合适的目录:
chmod +x cloudflared-linux-amd64
sudo mv cloudflared-linux-amd64 /usr/local/bin/cloudflared

Copy

第二步:配置 cloudflared

  1. 创建 cloudflared 的配置目录:
sudo mkdir /etc/cloudflared

Copy

  1. 创建配置文件:
sudo nano /etc/cloudflared/config.yml

Copy

  1. 填入以下内容:
proxy-dns: true
proxy-dns-upstream:
  - https://1.1.1.1/dns-query
  - https://1.0.0.1/dns-query

Copy

保存并退出。

第三步:将 cloudflared 设置为 systemd 服务

  1. 创建 systemd 服务文件:
sudo nano /etc/systemd/system/cloudflared.service

Copy

  1. 填入以下内容:
[Unit]
Description=cloudflared DNS over HTTPS 代理
After=syslog.target network-online.target

[Service]
Type=simple
User=root
ExecStart=/usr/local/bin/cloudflared proxy-dns
Restart=on-failure
RestartSec=10
KillMode=process

[Install]
WantedBy=multi-user.target

Copy

保存并退出。

  1. 启用并开始服务:
sudo systemctl enable cloudflared
sudo systemctl start cloudflared

Copy

第四步:更新系统 DNS 设置

  1. 编辑 resolv.conf
sudo nano /etc/resolv.conf

Copy

  1. 修改或添加:
nameserver 127.0.0.1

Copy

这将使用 cloudflared 代理作为系统的 DNS 服务器。

第五步:验证 DoH 配置

检查 DNS 请求是否通过 HTTPS:

dig @127.0.0.1 example.com

Copy

注意:使用 NetworkManager 或其他网络工具的系统可能会覆盖 /etc/resolv.conf。确保配置这些工具以防止此类更改,或使 resolv.conf 不可变。

我们希望此指南帮助您在 Linux 上使用 cloudflared 和 systemd 设置了 DNS over HTTPS。如果遇到任何问题,请查阅相关文档或寻求技术支持。

备份现有apt源配置

mv /etc/apt/sources.list /etc/apt/sources.list.old

Debian 11

全部复制后,直接粘贴并按下回车执行

官方源

cat > /etc/apt/sources.list << EOF
deb http://deb.debian.org/debian/ bullseye main contrib non-free
deb-src http://deb.debian.org/debian/ bullseye main contrib non-free
deb http://deb.debian.org/debian/ bullseye-updates main contrib non-free
deb-src http://deb.debian.org/debian/ bullseye-updates main contrib non-free
deb http://deb.debian.org/debian/ bullseye-backports main contrib non-free
deb-src http://deb.debian.org/debian/ bullseye-backports main contrib non-free
deb http://deb.debian.org/debian-security/ bullseye-security main contrib non-free
deb-src http://deb.debian.org/debian-security/ bullseye-security main contrib non-free
EOF

或者去掉源码包,提高apt update的速度

cat << EOF > /etc/apt/sources.list
deb http://deb.debian.org/debian/ bullseye main contrib non-free
deb http://deb.debian.org/debian/ bullseye-updates main contrib non-free
deb http://deb.debian.org/debian/ bullseye-backports main contrib non-free
deb http://deb.debian.org/debian-security/ bullseye-security main contrib non-free
EOF

阿里云镜像站

cat << EOF > /etc/apt/sources.list
deb http://mirrors.aliyun.com/debian/ bullseye main non-free contrib
deb-src http://mirrors.aliyun.com/debian/ bullseye main non-free contrib
deb http://mirrors.aliyun.com/debian-security/ bullseye-security main
deb-src http://mirrors.aliyun.com/debian-security/ bullseye-security main
deb http://mirrors.aliyun.com/debian/ bullseye-updates main non-free contrib
deb-src http://mirrors.aliyun.com/debian/ bullseye-updates main non-free contrib
deb http://mirrors.aliyun.com/debian/ bullseye-backports main non-free contrib
deb-src http://mirrors.aliyun.com/debian/ bullseye-backports main non-free contrib
EOF

腾讯云镜像站

cat << EOF > /etc/apt/sources.list
deb http://mirrors.tencent.com/debian/ bullseye main non-free contrib
deb-src http://mirrors.tencent.com/debian/ bullseye main non-free contrib
deb http://mirrors.tencent.com/debian-security/ bullseye-security main
deb-src http://mirrors.tencent.com/debian-security/ bullseye-security main
deb https://mirrors.tencent.com/debian/ bullseye-updates main non-free contrib
deb-src http://mirrors.tencent.com/debian/ bullseye-updates main non-free contrib
deb http://mirrors.tencent.com/debian/ bullseye-backports main non-free contrib
deb-src http://mirrors.tencent.com/debian/ bullseye-backports main non-free contrib
EOF

网易镜像站

cat << EOF > /etc/apt/sources.list
deb http://mirrors.163.com/debian/ bullseye main non-free contrib
deb-src http://mirrors.163.com/debian/ bullseye main non-free contrib
deb http://mirrors.163.com/debian-security/ bullseye-security main
deb-src http://mirrors.163.com/debian-security/ bullseye-security main
deb http://mirrors.163.com/debian/ bullseye-updates main non-free contrib
deb-src http://mirrors.163.com/debian/ bullseye-updates main non-free contrib
deb http://mirrors.163.com/debian/ bullseye-backports main non-free contrib
deb-src http://mirrors.163.com/debian/ bullseye-backports main non-free contrib
EOF

清华大学镜像站

cat << EOF > /etc/apt/sources.list
deb http://mirrors.tuna.tsinghua.edu.cn/debian/ bullseye main contrib non-free
deb-src http://mirrors.tuna.tsinghua.edu.cn/debian/ bullseye main contrib non-free
deb http://mirrors.tuna.tsinghua.edu.cn/debian/ bullseye-updates main contrib non-free
deb-src http://mirrors.tuna.tsinghua.edu.cn/debian/ bullseye-updates main contrib non-free
deb http://mirrors.tuna.tsinghua.edu.cn/debian/ bullseye-backports main contrib non-free
deb-src http://mirrors.tuna.tsinghua.edu.cn/debian/ bullseye-backports main contrib non-free
deb http://mirrors.tuna.tsinghua.edu.cn/debian-security bullseye-security main contrib non-free
deb-src http://mirrors.tuna.tsinghua.edu.cn/debian-security bullseye-security main contrib non-free
EOF

Debian 12

全部复制后,直接粘贴并按下回车执行

官方源

cat > /etc/apt/sources.list << EOF
deb http://deb.debian.org/debian/ bookworm main contrib non-free-firmware
deb-src http://deb.debian.org/debian/ bookworm main contrib non-free-firmware
deb http://deb.debian.org/debian/ bookworm-updates main contrib non-free-firmware
deb-src http://deb.debian.org/debian/ bookworm-updates main contrib non-free-firmware
deb http://deb.debian.org/debian/ bookworm-backports main contrib non-free-firmware
deb-src http://deb.debian.org/debian/ bookworm-backports main contrib non-free-firmware
deb http://deb.debian.org/debian-security/ bookworm-security main contrib non-free-firmware
deb-src http://deb.debian.org/debian-security/ bookworm-security main contrib non-free-firmware
EOF

或者去掉源码包,提高apt update的速度

cat << EOF > /etc/apt/sources.list
deb http://deb.debian.org/debian/ bookworm main contrib non-free-firmware
deb http://deb.debian.org/debian/ bookworm-updates main contrib non-free-firmware
deb http://deb.debian.org/debian/ bookworm-backports main contrib non-free-firmware
deb http://deb.debian.org/debian-security/ bookworm-security main contrib non-free-firmware
EOF

阿里云镜像站

cat << EOF > /etc/apt/sources.list
deb http://mirrors.aliyun.com/debian/ bookworm main non-free-firmware contrib
deb-src http://mirrors.aliyun.com/debian/ bookworm main non-free-firmware contrib
deb http://mirrors.aliyun.com/debian-security/ bookworm-security main
deb-src http://mirrors.aliyun.com/debian-security/ bookworm-security main
deb http://mirrors.aliyun.com/debian/ bookworm-updates main non-free-firmware contrib
deb-src http://mirrors.aliyun.com/debian/ bookworm-updates main non-free-firmware contrib
deb http://mirrors.aliyun.com/debian/ bookworm-backports main non-free-firmware contrib
deb-src http://mirrors.aliyun.com/debian/ bookworm-backports main non-free-firmware contrib
EOF

腾讯云镜像站

cat << EOF > /etc/apt/sources.list
deb http://mirrors.tencent.com/debian/ bookworm main non-free-firmware contrib
deb-src http://mirrors.tencent.com/debian/ bookworm main non-free-firmware contrib
deb http://mirrors.tencent.com/debian-security/ bookworm-security main
deb-src http://mirrors.tencent.com/debian-security/ bookworm-security main
deb https://mirrors.tencent.com/debian/ bookworm-updates main non-free-firmware contrib
deb-src http://mirrors.tencent.com/debian/ bookworm-updates main non-free-firmware contrib
deb http://mirrors.tencent.com/debian/ bookworm-backports main non-free-firmware contrib
deb-src http://mirrors.tencent.com/debian/ bookworm-backports main non-free-firmware contrib
EOF

网易镜像站

cat << EOF > /etc/apt/sources.list
deb http://mirrors.163.com/debian/ bookworm main non-free-firmware contrib
deb-src http://mirrors.163.com/debian/ bookworm main non-free-firmware contrib
deb http://mirrors.163.com/debian-security/ bookworm-security main
deb-src http://mirrors.163.com/debian-security/ bookworm-security main
deb http://mirrors.163.com/debian/ bookworm-updates main non-free-firmware contrib
deb-src http://mirrors.163.com/debian/ bookworm-updates main non-free-firmware contrib
deb http://mirrors.163.com/debian/ bookworm-backports main non-free-firmware contrib
deb-src http://mirrors.163.com/debian/ bookworm-backports main non-free-firmware contrib
EOF

清华大学镜像站

cat << EOF > /etc/apt/sources.list
deb http://mirrors.tuna.tsinghua.edu.cn/debian/ bookworm main contrib non-free-firmware
deb-src http://mirrors.tuna.tsinghua.edu.cn/debian/ bookworm main contrib non-free-firmware
deb http://mirrors.tuna.tsinghua.edu.cn/debian/ bookworm-updates main contrib non-free-firmware
deb-src http://mirrors.tuna.tsinghua.edu.cn/debian/ bookworm-updates main contrib non-free-firmware
deb http://mirrors.tuna.tsinghua.edu.cn/debian/ bookworm-backports main contrib non-free-firmware
deb-src http://mirrors.tuna.tsinghua.edu.cn/debian/ bookworm-backports main contrib non-free-firmware
deb http://mirrors.tuna.tsinghua.edu.cn/debian-security bookworm-security main contrib non-free-firmware
deb-src http://mirrors.tuna.tsinghua.edu.cn/debian-security bookworm-security main contrib non-free-firmware
EOF

sed -i_orig "s/data.status === 'Active'/true/g" /usr/share/pve-manager/js/pvemanagerlib.js
sed -i_orig "s/if (res === null || res === undefined || \!res || res/if(/g" /usr/share/javascript/proxmox-widget-toolkit/proxmoxlib.js
sed -i_orig "s/.data.status.toLowerCase() !== 'active'/false/g" /usr/share/javascript/proxmox-widget-toolkit/proxmoxlib.js
systemctl restart pveproxy

确认无误后,重新启动服务器

reboot