解压
unzip FileName.zip压缩
zip FileName.zip DirName解压
unzip FileName.zip压缩
zip FileName.zip DirName解压
tar zxvf FileName.tar.gz压缩
tar zcvf FileName.tar.gz DirNameNginx 利用 IP2Locaion 模块实现地区负载均衡和IP定位。
由于GeoIP2的效率实在是“惊人”,和那“高到爆”的识别精度,真是让人想爆粗口。经过权衡,将IP定位模块更换为 IP2Locaion。
如果还没安装 IP2Location C Library,请先移步到 https://www.24kplus.com/linux/871.html 安装 IP2Location C Library
下载 Nginx IP2Locaion 模块
git clone https://github.com/ip2location/ip2location-nginx.git
查看当前 Nginx 版本信息
nginx -V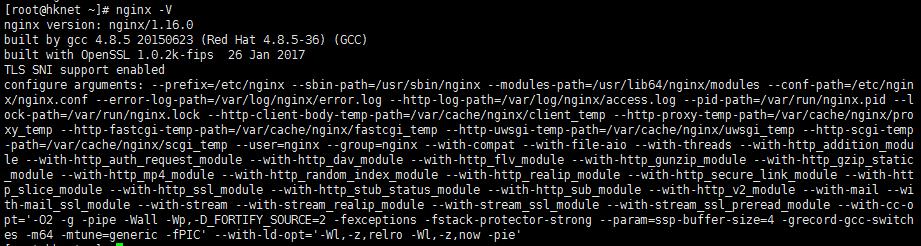
可以看到 Nginx 的版本为1.16.0 和 configure 参数,把 configure 参数拷贝保存下来,后面需要用到。
到官网 https://nginx.org/en/download.html 找到对应的版本源码下载并解压。本站以1.16.0为例:
下载并解压
wget https://nginx.org/download/nginx-1.16.0.tar.gz
tar -zxf nginx-1.16.0.tar.gz
cd nginx-1.16.0
备用下载地址: https://down.24kplus.com/linux/nginx-1.16.0.tar.gz
生成新的 nginx
把刚刚复制的 configure 参数粘贴到 ./configure 后面, 在结尾处加入 -–add-module=../ip2location-nginx
./configure \
--prefix=/etc/nginx \
.....
# 在结尾处加入一行
-–add-module=../ip2location-nginx
# 如果想编译为动态模块,则添加
--add-dynamic-module=../ip2location-nginxmake编译好之后不要安装, 停止 nginx 服务
systemctl stop nginx复制编译好的新 nginx 文件拷贝到sbin下
cp /usr/sbin/nginx /usr/sbin/nginx.bak
cp objs/nginx /usr/sbin
编辑 nginx.conf 文件,在 http {} 中加入以下代码:
http {
……
#doc https://github.com/ip2location/ip2location-nginx
# on 为启用,off 为禁用
ip2location on;
#/usr/share/IP2Location/IP2LOCATION-LITE-DB3.BIN 替换成你的 IP2Locaion 数据路径。
ip2location_database /usr/share/IP2Location/IP2LOCATION-LITE-DB3.BIN;
# 可选参数 ip2location_access_type file_io|shared_memory|cache_memory
# 默认为 shared_memory
# 建议不要选择 file_io, 否则可能会严重拖慢响应速度。
ip2location_access_type shared_memory
……
}
官方提供免费版BIN文件下载: https://lite.ip2location.com/ip2location-lite ,根据自己的需要下载对应版本。
编辑 fastcgi_params 文件,在结尾加入以下几行代码(可选):
#IP2Location, with ip2location on;
fastcgi_param  IP_COUNTRY_CODE		$ip2location_country_short;
fastcgi_param  IP_COUNTRY_NAME		$ip2location_country_long;
fastcgi_param  IP_REGION_NAME		$ip2location_region;
fastcgi_param IP_CITY_NAME $ip2location_city;更多参数查考官方文档:https://github.com/ip2location/ip2location-nginx
启动 nginx 服务
systemctl start nginx在 phpinfo 信息中可以看到:

当然,也可以在 nginx 中直接使用 $ip2location_country_short,$ip2location_region等变量来实现地区负载均衡。
wget -O IP2Location-C-Library-8.0.8.tar.gz https://codeload.github.com/chrislim2888/IP2Location-C-Library/tar.gz/8.0.8
tar -zxf IP2Location-C-Library-8.0.8.tar.gz
cd IP2Location-C-Library-8.0.8备用下载地址:https://down.24kplus.com/linux/IP2Location-C-Library-8.0.8.tar.gz
autoreconf -i -v --force
./configure --prefix=/usr
make
make install
cd data
perl ip-country.pl
如果出现错误
configure.ac:42: error: possibly undefined macro: AC_PROG_LIBTOOL
       If this token and others are legitimate, please use m4_pattern_allow.
       See the Autoconf documentation.
执行:
yum install libtool libsysfscd test
./test-IP2LocationIP2Location API version: 8.0.8 (80008)
IP2Location IPv4 Testing passed.
IP2Location IPv6 Testing passed.
CentOS 安装 libtool 2.4.6, 解决 error: Libtool library used but 'LIBTOOL' is undefined 错误 。
wget http://ftpmirror.gnu.org/libtool/libtool-2.4.6.tar.gz
tar -zxf libtool-2.4.6.tar.gz
cd libtool-2.4.6备用下载地址:https://down.24kplus.com/linux/libtool-2.4.6.tar.gz
./configure --prefix=/usr
make
sudo make install
sudo ldconfig
CentOS 7 源码安装 p11-kit,解决 configure: error: p11-kit >= 0.23.1 was not found. To disable PKCS #11 support 错误。
wget https://github.com/p11-glue/p11-kit/releases/download/0.23.16/p11-kit-0.23.16.tar.gz
tar -zxvf p11-kit-0.23.16.tar.gz
cd p11-kit-0.23.16
备用下载地址: https://down.24kplus.com/linux/p11-kit-0.23.16.tar.gz
./configure \
--prefix=/usr \
--bindir=/usr/bin \
--sbindir=/usr/sbin \
--libexecdir=/usr/libexec \
--sysconfdir=/etc/p11-kit \
--libdir=/usr/lib64 \
--includedir=/usr/include \
--datarootdir=/usr/share \
--infodir=/usr/share/info \
--localedir=/usr/local \
--mandir=/usr/share/man \
--docdir=/usr/share/doc/p11-kit
make
make install
如果出现 configure: error: libtasn1 not found. Building without it results in significant loss of functionality. To proceed use --without-libtasn1 错误,执行:
yum install -y libtasn1-devel如果出现 configure: error: Package requirements (libffi >= 3.0.0) were not met: No package 'libffi' found 错误,执行:
yum install -y libffi-devel
CentOS 7 源码安装 libidn2 最新版,解决 error while loading shared libraries: libidn2.so.4: cannot open shared object file: No such file or directory 错误
wget https://ftp.gnu.org/gnu/libidn/libidn2-latest.tar.gz
tar -zxvf libidn2-latest.tar.gz
cd libidn2*./configure \
--prefix=/usr \
--bindir=/usr/bin \
--sbindir=/usr/sbin \
--libexecdir=/usr/libexec \
--sysconfdir=/etc/libidn2 \
--libdir=/usr/lib64 \
--includedir=/usr/include \
--datarootdir=/usr/share \
--infodir=/usr/share/info \
--localedir=/usr/local \
--mandir=/usr/share/man \
--docdir=/usr/share/doc/libidn2 \
--with-packager \
--with-packager-version \
--with-packager-bug-reports
make
make installCentOS 7 源码安装 openpts 0.2.6。
wget https://mirrors.xtom.com/osdn/openpts/54410/openpts-0.2.6.tar.gz
tar -zxvf openpts-0.2.6.tar.gz
cd openpts-0.2.6备用下载地址:https://down.24kplus.com/linux/openpts-0.2.6.tar.gz
./bootstrap.sh
./configure \
--prefix=/usr \
--bindir=/usr/bin \
--sbindir=/usr/sbin \
--libexecdir=/usr/libexec \
--sysconfdir=/etc/openpts \
--libdir=/usr/lib64 \
--includedir=/usr/include \
--datarootdir=/usr/share \
--infodir=/usr/share/info \
--localedir=/usr/local \
--mandir=/usr/share/man \
--docdir=/usr/share/doc/openpts \
--with-tss \
--with-aru \
--enable-tnc
make
make install
如果出现 /include/openpts.h:50:17: fatal error: tss.h: No such file or directory 错误,安装:
yum install trousers-devel 如果出现 fatal error: uuid.h: No such file or directory 错误,安装:
yum install e2fsprogs-devel uuid-devel libuuid-develCentOS 7 源码安装 tpm-tools 1.3.9.1
mkdir tpm-tools
cd tpm-tools
wget https://nchc.dl.sourceforge.net/project/trousers/tpm-tools/1.3.9.1/tpm-tools-1.3.9.1.tar.gz
tar -zxvf tpm-tools-1.3.9.1.tar.gz备用下载地址:https://down.24kplus.com/linux/tpm-tools-1.3.9.1.tar.gz
./configure \
--prefix=/usr \
--bindir=/usr/bin \
--sbindir=/usr/sbin \
--libexecdir=/usr/libexec \
--sysconfdir=/etc/tpm-tools \
--libdir=/usr/lib64 \
--includedir=/usr/include \
--datarootdir=/usr/share \
--infodir=/usr/share/info \
--localedir=/usr/local \
--mandir=/usr/share/man \
--docdir=/usr/share/doc/tpm-tools
make
make install
如果出现 configure: error: tss lib not found: libtspi.so 错误:
yum install trousers-devel如果出现 configure: error: openssl lib not found: libcrypto.so 错误:
yum install openssl-devel优化 CentOS 7 或者 Ubuntu 16.04 以上版本下的 shadowsocks-libev 网络速度,让 shadowsocks-libev 轻松跑满宽带。同样适用于老版本 3.0 的 shadowsocks 优化。
如未安装 shadowsocks-libev 的可乘坐直达航班: CentOS 安装 Ubuntu 安装
1、新建配置文件:
sudo vi /etc/sysctl.d/local.conf复制粘贴:
#max open files
fs.file-max = 51200
#max read buffer
net.core.rmem_max = 67108864
#max write buffer
net.core.wmem_max = 67108864
#default read buffer
net.core.rmem_default = 65536
#default write buffer
net.core.wmem_default = 65536
#max processor input queue
net.core.netdev_max_backlog = 4096
#max backlog
net.core.somaxconn = 4096
#resist SYN flood attacks
net.ipv4.tcp_syncookies = 1
#reuse timewait sockets when safe
net.ipv4.tcp_tw_reuse = 1
#turn off fast timewait sockets recycling
net.ipv4.tcp_tw_recycle = 0
#short FIN timeout
net.ipv4.tcp_fin_timeout = 30
#short keepalive time
net.ipv4.tcp_keepalive_time = 1200
#outbound port range
net.ipv4.ip_local_port_range = 10000 65000
#max SYN backlog
net.ipv4.tcp_max_syn_backlog = 4096
#max timewait sockets held by system simultaneously
net.ipv4.tcp_max_tw_buckets = 5000
#turn on TCP Fast Open on both client and server side
net.ipv4.tcp_fastopen = 3
#TCP receive buffer
net.ipv4.tcp_rmem = 4096 87380 67108864
#TCP write buffer
net.ipv4.tcp_wmem = 4096 65536 67108864
#turn on path MTU discovery
net.ipv4.tcp_mtu_probing = 1

net.ipv4.tcp_congestion_control = bbr
2、运行:
sysctl --system3、编辑配置文件limits.conf
sudo vi /etc/security/limits.conf在文件结尾添加两行:
* soft nofile 51200
* hard nofile 51200
4、编辑 shadowsocks-libev 服务
# 服务配置文件名称视具体而定
sudo vi /etc/systemd/system/shadowsocks-libev.service
在[Service]之后加入 ExecStartPre=/bin/sh -c ‘ulimit -n 51200’
[Unit]
Description=Shadowsocks-libev Server
After=network.target

[Service]
Type=simple
# 服务配置可能有所不一样,视实际而定
# 在这里加入 ExecStartPre=/bin/sh -c 'ulimit -n 51200'
ExecStartPre=/bin/sh -c 'ulimit -n 51200'
ExecStart=/usr/local/bin/ss-server -c /etc/shadowsocks-libev/config.json -u
Restart=on-abort

[Install]
WantedBy=multi-user.target
5、重新加载 shadowsocks-libev 服务配置
sudo systemctl daemon-reload6、重启 Shadowsocks-libev 服务
sudo systemctl restart shadowsocks-libevTCP Fast Open可以降低Shadowsocks服务器和客户端的延迟。实际上在上一步已经开启了TCP Fast Open,现在只需要在Shadowsocks配置中启用TCP Fast Open。1、编辑config.json:
sudo vi /etc/shadowsocks-libev/config.json将 fast_open 的值由 false 修改为 true
{
     "server":"0.0.0.0",
     "server_port":8388,
     "local_port":1080,
     "password":"password",
     "timeout":600,
     "method":"aes-256-cfb",
     /*这里设置 fast_open:true,如果没有则加入*/
     "fast_open": true
 }
2、重启 shadowsocks-libev 服务:
sudo systemctl restart shadowsocks-libev三、最后开启 Google BBR
优化到此基本完成。