解压
tar zxvf FileName.tar.gz压缩
tar zcvf FileName.tar.gz DirName解压
tar zxvf FileName.tar.gz压缩
tar zcvf FileName.tar.gz DirNameNginx 利用 IP2Locaion 模块实现地区负载均衡和IP定位。
由于GeoIP2的效率实在是“惊人”,和那“高到爆”的识别精度,真是让人想爆粗口。经过权衡,将IP定位模块更换为 IP2Locaion。
如果还没安装 IP2Location C Library,请先移步到 https://www.24kplus.com/linux/871.html 安装 IP2Location C Library
下载 Nginx IP2Locaion 模块
git clone https://github.com/ip2location/ip2location-nginx.git
查看当前 Nginx 版本信息
nginx -V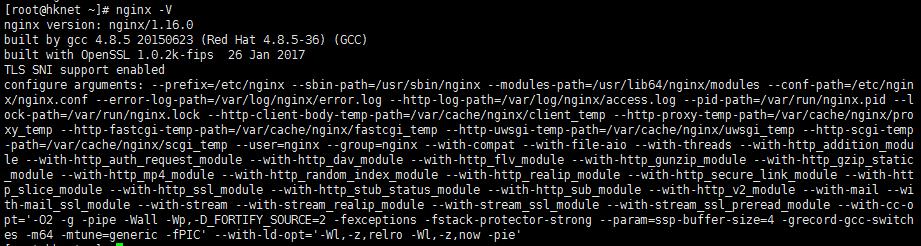
可以看到 Nginx 的版本为1.16.0 和 configure 参数,把 configure 参数拷贝保存下来,后面需要用到。
到官网 https://nginx.org/en/download.html 找到对应的版本源码下载并解压。本站以1.16.0为例:
下载并解压
wget https://nginx.org/download/nginx-1.16.0.tar.gz
tar -zxf nginx-1.16.0.tar.gz
cd nginx-1.16.0
备用下载地址: https://down.24kplus.com/linux/nginx-1.16.0.tar.gz
生成新的 nginx
把刚刚复制的 configure 参数粘贴到 ./configure 后面, 在结尾处加入 -–add-module=../ip2location-nginx
./configure \
--prefix=/etc/nginx \
.....
# 在结尾处加入一行
-–add-module=../ip2location-nginx
# 如果想编译为动态模块,则添加
--add-dynamic-module=../ip2location-nginxmake编译好之后不要安装, 停止 nginx 服务
systemctl stop nginx复制编译好的新 nginx 文件拷贝到sbin下
cp /usr/sbin/nginx /usr/sbin/nginx.bak
cp objs/nginx /usr/sbin
编辑 nginx.conf 文件,在 http {} 中加入以下代码:
http {
……
#doc https://github.com/ip2location/ip2location-nginx
# on 为启用,off 为禁用
ip2location on;
#/usr/share/IP2Location/IP2LOCATION-LITE-DB3.BIN 替换成你的 IP2Locaion 数据路径。
ip2location_database /usr/share/IP2Location/IP2LOCATION-LITE-DB3.BIN;
# 可选参数 ip2location_access_type file_io|shared_memory|cache_memory
# 默认为 shared_memory
# 建议不要选择 file_io, 否则可能会严重拖慢响应速度。
ip2location_access_type shared_memory
……
}
官方提供免费版BIN文件下载: https://lite.ip2location.com/ip2location-lite ,根据自己的需要下载对应版本。
编辑 fastcgi_params 文件,在结尾加入以下几行代码(可选):
#IP2Location, with ip2location on;
fastcgi_param  IP_COUNTRY_CODE		$ip2location_country_short;
fastcgi_param  IP_COUNTRY_NAME		$ip2location_country_long;
fastcgi_param  IP_REGION_NAME		$ip2location_region;
fastcgi_param IP_CITY_NAME $ip2location_city;更多参数查考官方文档:https://github.com/ip2location/ip2location-nginx
启动 nginx 服务
systemctl start nginx在 phpinfo 信息中可以看到:

当然,也可以在 nginx 中直接使用 $ip2location_country_short,$ip2location_region等变量来实现地区负载均衡。
sudo apt-get install python python-twisted python-openssl python-setuptools intltool python-xdg python-chardet geoip-database python-libtorrent python-notify python-pygame python-glade2 librsvg2-common xdg-utils python-mako python-dev(1)获取源码
git clone git://deluge-torrent.org/deluge.git
cd deluge
git checkout -b master remotes/origin/master
(2)安装
python setup.py build
sudo python setup.py install --install-layout=deb
如果出现 error: command 'x86_64-linux-gnu-gcc' failed with exit status 1 错误,执行:
sudo apt-get install python-dev  \
     build-essential libssl-dev libffi-dev \
     libxml2-dev libxslt1-dev zlib1g-dev \
python-pipsudo cp packaging/systemd/deluged.service /etc/systemd/system/deluged.service
sudo cp packaging/systemd/deluge-web.service /etc/systemd/system/deluge-web.servicesudo systemctl start deluged
sudo systemctl enable deluged
sudo systemctl start deluge-web
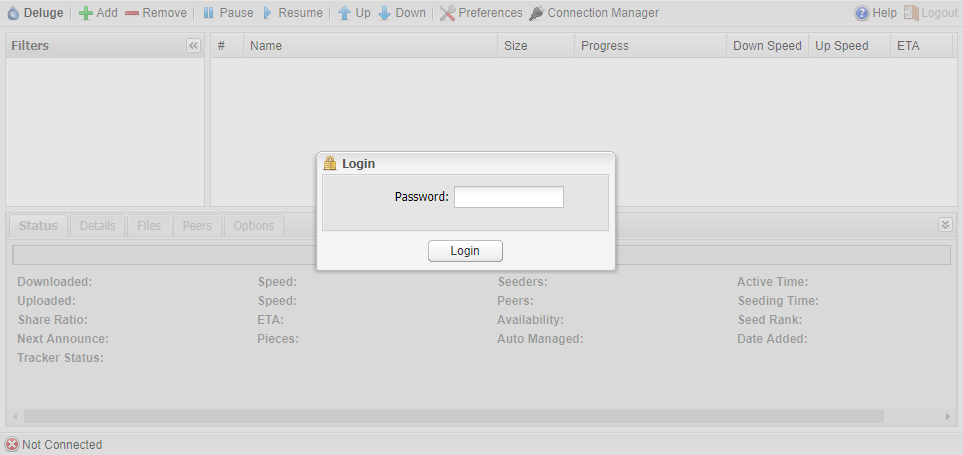
sudo systemctl enable deluge-webdeluge-web默认只允许本地访问。默认端口:8112,默认密码:deluge
#启用远程访问
deluge-console "config -s allow_remote True"

#禁用远程访问
deluge-console "config allow_remote"
访问地址:http://你的IP:8112
sudo systemctl stop deluge-web
sudo systemctl disable deluge-web
sudo systemctl stop deluged
sudo systemctl disable deluged
sudo rm -rf /etc/systemd/system/deluge*

sudo rm -rf /usr/bin/deluge*

sudo rm -rf /usr/lib/python2.7/dist-packages/deluge*要安装Docker CE,仅支持以下Ubuntu 64位版本:
Docker CE 支持 x86_64,amd64, armhf, arm64, s390x (IBM Z), and ppc64le (IBM Power) 架构.
老版本的 Docker 被称为 docker, docker.io 或 docker-engine 。如果安装了,需要先卸载它们以及相关的依赖项。
$ sudo apt-get remove docker docker-engine docker.io containerd runc保留 /var/lib/docker/内容。
(1)更新 apt 包索引:
$ sudo apt-get update(2)安装 repository 和相关依赖:
$ sudo apt-get install \
    apt-transport-https \
    ca-certificates \
    curl \
    gnupg-agent \
    software-properties-common
(3)添加 Docker 官方 GPG key:
$ curl -fsSL https://download.docker.com/linux/ubuntu/gpg | sudo apt-key add -通过搜索指纹的最后8个字符,确认含有指纹9DC8 5822 9FC7 DD38 854A E2D8 8D81 803C 0EBF CD88的密钥。
$ sudo apt-key fingerprint 0EBFCD88
pub   rsa4096 2017-02-22 [SCEA]
      9DC8 5822 9FC7 DD38 854A  E2D8 8D81 803C 0EBF CD88
uid           [ unknown] Docker Release (CE deb) <docker@docker.com>
sub   rsa4096 2017-02-22 [S]
(4)添加 repository
根据不同架构选择需要添加的 repository
# x86_64 / amd64
$ sudo add-apt-repository "deb [arch=amd64] https://download.docker.com/linux/ubuntu $(lsb_release -cs) stable"

#armhf
$ sudo add-apt-repository "deb [arch=armhf] https://download.docker.com/linux/ubuntu $(lsb_release -cs) stable"

#arm64
$ sudo add-apt-repository "deb [arch=arm64] https://download.docker.com/linux/ubuntu $(lsb_release -cs) stable"

#ppc64le (IBM Power)
$ sudo add-apt-repository "deb [arch=ppc64el] https://download.docker.com/linux/ubuntu $(lsb_release -cs) stable"

#s390x (IBM Z)
$ sudo add-apt-repository "deb [arch=s390x] https://download.docker.com/linux/ubuntu $(lsb_release -cs) stable"
(5)更新 apt 包索引:
$ sudo apt-get update(6)安装最新版 Docker CE 和 containerd
$ sudo apt-get install docker-ce docker-ce-cli containerd.io通过运行 hello-world 镜像验证是否正确安装了Docker CE:
$ sudo docker run hello-world官方英文安装文档:https://docs.docker.com/install/linux/docker-ce/ubuntu/
方法一、如果你知道要删除软件的具体名称,可以使用
sudo apt-get remove --purge 软件名称
sudo apt-get autoremove --purge 软件名称
方法二、如果不知道要删除软件的具体名称,可以使用
dpkg --get-selections | grep ‘软件相关名称’sudo apt-get purge 一个带core的package,如果没有带core的package,则是情况而定。
清理残留数据
dpkg -l |grep ^rc|awk '{print $2}' |sudo xargs dpkg -PUbuntu 16.04 或更高版本安装 .NET Core SDK,需要注意的是.NET Core仅支持 16.04 或更高版本的 64位系统。
在安装.NET之前,需要注册 Microsoft key,注册 repos 并安装所需的依赖项。
打开 terminal 并运行以下命令:
wget -q https://packages.microsoft.com/config/ubuntu/16.04/packages-microsoft-prod.deb
sudo dpkg -i packages-microsoft-prod.deb在 terminal 中,运行以下命令:
sudo apt-get install apt-transport-https
sudo apt-get update
sudo apt-get install dotnet-sdk-2.2如果出现Unable to locate package dotnet-sdk-2.2错误,运行以下命令:
sudo dpkg --purge packages-microsoft-prod && sudo dpkg -i packages-microsoft-prod.deb
sudo apt-get update
sudo apt-get install dotnet-sdk-2.2
如果还没有安装成功,可以尝试以下命令运行手动安装:
sudo apt-get install -y gpg
wget -qO- https://packages.microsoft.com/keys/microsoft.asc | gpg --dearmor > microsoft.asc.gpg
sudo mv microsoft.asc.gpg /etc/apt/trusted.gpg.d/
wget -q https://packages.microsoft.com/config/ubuntu/18.04/prod.list
sudo mv prod.list /etc/apt/sources.list.d/microsoft-prod.list
sudo chown root:root /etc/apt/trusted.gpg.d/microsoft.asc.gpg
sudo chown root:root /etc/apt/sources.list.d/microsoft-prod.list
sudo apt-get install -y apt-transport-https
sudo apt-get update
sudo apt-get install dotnet-sdk-2.2官方英文原文:https://dotnet.microsoft.com/download/linux-package-manager/ubuntu18-04/sdk-current
Deluge是一个功能齐全的跨平台BitTorrent 客户端软件,可在Linux, OS X, Unix和Windows操作系统下工作。它使用libtorrent作为其后端,有包括GTK+,网络远程客户端,命令行模式等多种用户界面。其设计方针是体积小巧且节约系统资源,通过丰富的插件来实现核心以外的众多功能。Deluge响应Freedesktop.org的倡议,兼容于GNOME, KDE, XFCE和其它多种桌面环境。它还是一款自由软件,使用GPLv3进行授权。
sudo apt-get install delugesudo apt-get install deluged deluge-web deluge-consoledeluge 的安装目录在 /usr/lib/python2.7/dist-packages/deluge
如果出现add-apt-repository: command not found错误,执行:
sudo apt-get install python-software-propertiessudo vi /etc/systemd/system/deluged.service复制粘贴:
[Unit]
Description=Deluge Bittorrent Client Daemon
Documentation=man:deluged
After=network-online.target
[Service]
Type=simple
User=root
ExecStart=/usr/bin/deluged -d
ExecStop=/usr/bin/killall -w -s 2 /usr/bin/deluged
Restart=on-failure
TimeoutStopSec=300
[Install]
WantedBy=multi-user.targetsudo vi /etc/systemd/system/deluge-web.service复制粘贴:
[Unit]
Description=Deluge Bittorrent Client Web Interface
Documentation=man:deluge-web
After=network-online.target deluged.service
Wants=deluged.service
[Service]
Type=simple
User=root
ExecStart=/usr/bin/deluge-web
ExecStop=/usr/bin/kill /usr/bin/deluge-web
Restart=on-failure
[Install]
WantedBy=multi-user.targetsudo systemctl start deluged
sudo systemctl enable deluged
sudo systemctl start deluge-web
sudo systemctl enable deluge-webdeluge-web默认只允许本地访问。默认端口:8112,默认密码:deluge
#启用远程访问
deluge-console "config -s allow_remote True"

#禁用远程访问
deluge-console "config allow_remote"
访问地址:http://你的公网IP:8112
到此,deluge 客户端配置基本完成。
deluge 官方网站:https://www.deluge-torrent.org/
Ubuntu 18.04的ssh版本中,root用户默认被禁止连接
需要编辑 /etc/ssh/sshd_config 文件
sudo vi /etc/ssh/sshd_config找到PermitRootLogin,设为yes
PermitRootLogin yes重启ssh服务
sudo systemctl restart sshphp-fpm 配置名称视具体版本而定
sudo vi /etc/php/7.2/fpm/php.ini找到以下两项,修改为自己想要的值,比如50M
post_max_size = 50M
upload_max_filesize = 50Msudo systemctl restart php7.2-fpm
sudo systemctl restart nginxGoogle 开源了其 TCP BBR 拥塞控制算法,并提交到了 Linux 内核,从 4.9 开始,Linux 内核已经用上了该算法。根据以往的传统,Google 总是先在自家的生产环境上线运用后,才会将代码开源,此次也不例外。 根据实地测试,在部署了最新版内核并开启了 TCP BBR 的机器上,网速甚至可以提升好几个数量级。
运行 lsmod | grep bbr,如果结果中没有tcp_bbr,则先运行:
modprobe tcp_bbr
echo "tcp_bbr" >> /etc/modules-load.d/modules.conf
运行:
echo "net.core.default_qdisc=fq" >> /etc/sysctl.conf
echo "net.ipv4.tcp_congestion_control=bbr" >> /etc/sysctl.conf
运行:
sysctl -p
保存生效。运行:
sysctl net.ipv4.tcp_available_congestion_control
sysctl net.ipv4.tcp_congestion_control
若均有bbr,则开启BBR成功。